Done in a Day: Stop Jeep Hood Flutter
Posted in How To: Body Chassis on May 15, 2018Stuart A. Bourdon Technical Editor, Jp Magazine
We’re introducing a new series of tech articles in Jp Magazine that will focus on quick and easy upgrades or modifications that either make your Jeep work better, make it easier to operate, or make it more fun to wheel. These upgrades or modifications can all be done in just one day. The idea is that on any given Saturday, you could get up, have breakfast, go out to the garage, and do something to your Jeep that improves it—and be done by dinnertime so you can go wheeling on Sunday. Some of our Done in a Day upgrades may even get you on the trail that Saturday afternoon.
This Done in a Day offers a cure for hood lift. Hood lift or flutter can be downright spooky, as the front of your Jeep’s engine hood jumps like it’s about to fly off every time you encounter the bow wave of an 18-wheeler or drive head-on into high winds. The hood lift phenomenon is especially common on YJs, TJs, and JKs, because air collects at the back of the engine compartment creating pressure that forces the hood upward.
This is not so with the new Wrangler JL because Jeep designers incorporated engine compartment vents just behind the front fenders and much better hood hold-downs. However, for the YJ, TJ, and JK owner, there is a simple fix that doesn’t include drilling holes in the body to make vents, cutting panels out to replace with screens, or wrapping a ratchet strap around the nose of your Jeep to keep the engine hood still.
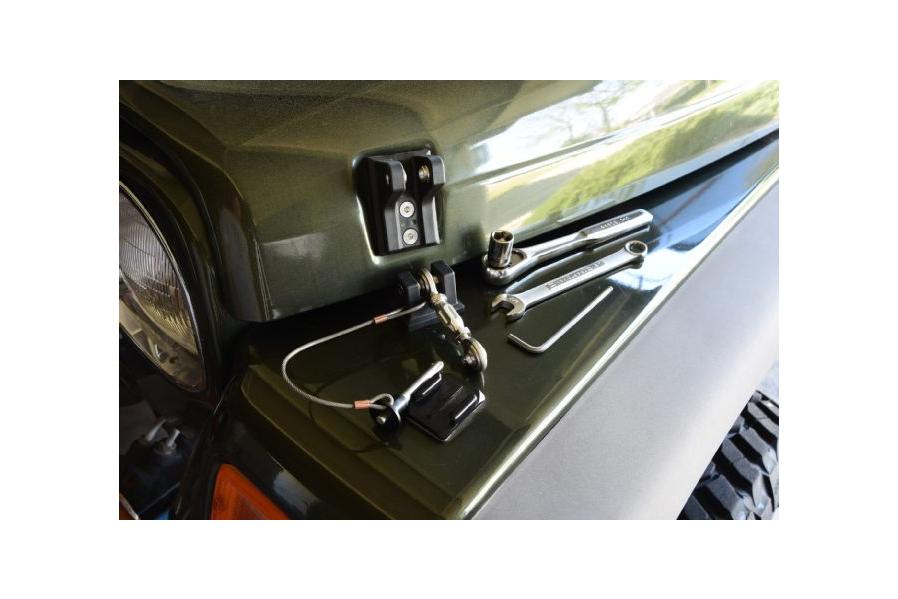
The Drake Off Road Hood Hold Downs feature cast-aluminum brackets, a billet-aluminum turnbuckle, and stainless steel Heim joints. Its steel quick-release pin is secured with a stainless steel cable lanyard. Installation involves basic handtools, no drilling is necessary, but it’s important to note that the plastic pads next to the factory lower brackets must be retained for these new hood hold-downs to work properly.
The plastic hood hold-down can get stretched out, degraded, or broken with time and stress; and even brand new, it doesn’t seem capable of keeping the hood from lifting. Just like the proverbial better mousetrap, we thought there must be a better hood hold-down that can replace the plastic factory piece. We went looking for that something better and found Drake Off Road Hood Hold Downs.
Available for Jeep Wrangler YJs, TJs, and JKs, the hood hold-down from Drake is designed to work with stock fenders, and may not work with all aftermarket fenders. Featuring cast-aluminum brackets, a billet-aluminum turnbuckle, and stainless steel Heim joints, the Drake Hood Hold Down is secured by a steel quick-release push-pin on a stainless steel cable lanyard.
The Drake Off Road Hood Hold Downs required no drilling of the Jeep’s body, and with just a few handtools, they were simple to install. Once properly assembled and installed, the turnbuckles could be adjusted so that the closed hood was tightly held against the rubber isolators on the fenders. Check out the photos to see how the Drake Off Road Hood Hold Downs were installed, and stay tuned to Jp Magazine and jpmagazine.com for more Done in a Day upgrades.
Using a hex wrench to hold the countersunk hex bolts on the outside and a socket for the nut and washer sets on the inside, the upper brackets replaced the factory brackets. New rubber isolators between the brackets and hood come with the kit.
The turnbuckles and Heim joints are shipped assembled to the upper and lower mounting brackets. They must be disassembled for installation on the fenders. The pin and two bearings you see next to the turnbuckle are very important for installation. Be careful not to lose them.
The Drake Off Road Hood Hold Down lower mounting brackets (with attached pin) were installed using a wrench for the countersunk hex bolts up top and a socket on the nuts and washers below the fender. It’s so much easier to hold the top hex nut tight when installing the lower brackets to the fenders when the turnbuckle and Heim joints are not installed already.
Now comes the tricky part. One of the bearings must be placed over the post on the inside of the lower mounting bracket, and the other bearing placed on the partially inserted threaded pin. While keeping the bearing on the pin and the opposing post (we found a tiny bit of grease helped hold them in place), and allowing only enough room between the bearings for the inner ball of the Heim joint to slide between them, the pin must be pushed all the way through the Heim joint and the bearings on both sides.
With a little patience, and a pair of glasses for some of us, the threaded pin was pushed all the way through the Heim joint and bearings. Take your time. We would be surprised if anybody could do it on the first try. We went fishing for the bearings a couple of times while trying to squeeze that Heim joint through the narrow gap presented between the two bearings. Once the pin is through and finger-tight into the post, a hex wrench was used to fully tighten the pin, locking the Heim joint end into place.
We chose to mount our Drake Off Road Jeep Hood Hold Downs with the stainless steel cable lanyard forward of the hold-down. A strike on the top of the pin from a stone or branch will only drive it deeper, rather than possibly dislodging the pin if it were mounted with the tip of the pin facing forward and exposed. It also allows the pins and their cables to dangle over the fender fronts and out of the way when the hood is open.
Tools Needed
5mm hex (Allen) wrench
4mm hex (Allen) wrench
Ratchet with 10mm, 13mm, and 15mm sockets